– “No Resting”: Air cell damage occurs when there is a tear between the two membranes of the egg, often caused by vibrations, drops, and other factors during transport. This type of damage cannot be repaired by allowing the eggs to rest. Instead, leaving them to rest may further age the eggs and reduce their viability. Therefore, it is advisable to incubate the eggs as soon as possible to maximize their chance of hatching successfully. Related Post : Is “Resting” fertile eggs necessary?
– The development of the embryo within the fertilized egg begins from the instant the egg enters the incubator, not from the day the eggs were laid.
– The day the eggs enter the incubator is considered day 0 of incubation, not day 1.
– Never rely solely on your incubator’s temperature and humidity display. It’s essential to use a separate thermometer and hygrometer for accuracy. Before starting the hatch, especially with a new incubator, verify the temperature using a reliable independent thermometer and hygrometer placed inside the incubator to identify any hot or cold spots. Even a slight deviation of 1-2 degrees Celsius can significantly impact the out come. Read more.
– Google and YouTube serve as valuable resources for learning about egg incubation and chick rearing. It’s essential to conduct thorough research and familiarize yourself with terms such as “turning eggs,” “pointy/round ends,” “lockdown,” and more. Take the time to understand the process and prepare adequately for successful hatching and chick care.
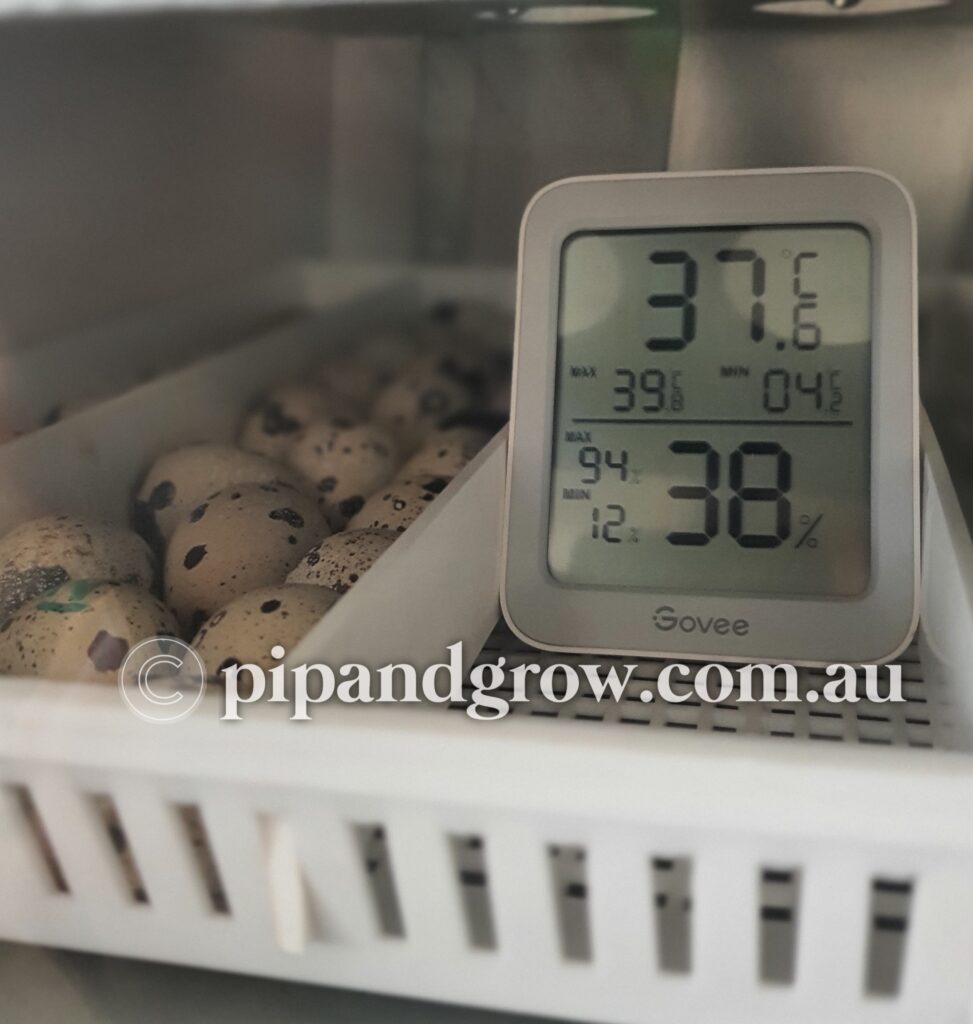
– Temperature : 37.5°C
– Humidity : Between 35-45% are generally recommended during this stage.
However, this can vary based on factors such as the type of incubator used, altitude, location, and ambient temperature and humidity of the room where incubator is located. We adjust the humidity levels according to these variables, especially considering seasonal changes. If this is your first time incubating, or got a new incubator, It’s important to view the process as a learning experience; if one method doesn’t yield the desired results, try experimenting with different approaches to find what works best for your specific conditions and equipment. Getting to know your incubator and making adjustments based on your observations and learning is key, as there’s no one-size-fits-all solution.
– Eggs must be turned at least two times a day either manually or using an available auto-turning mechanism until day 15.
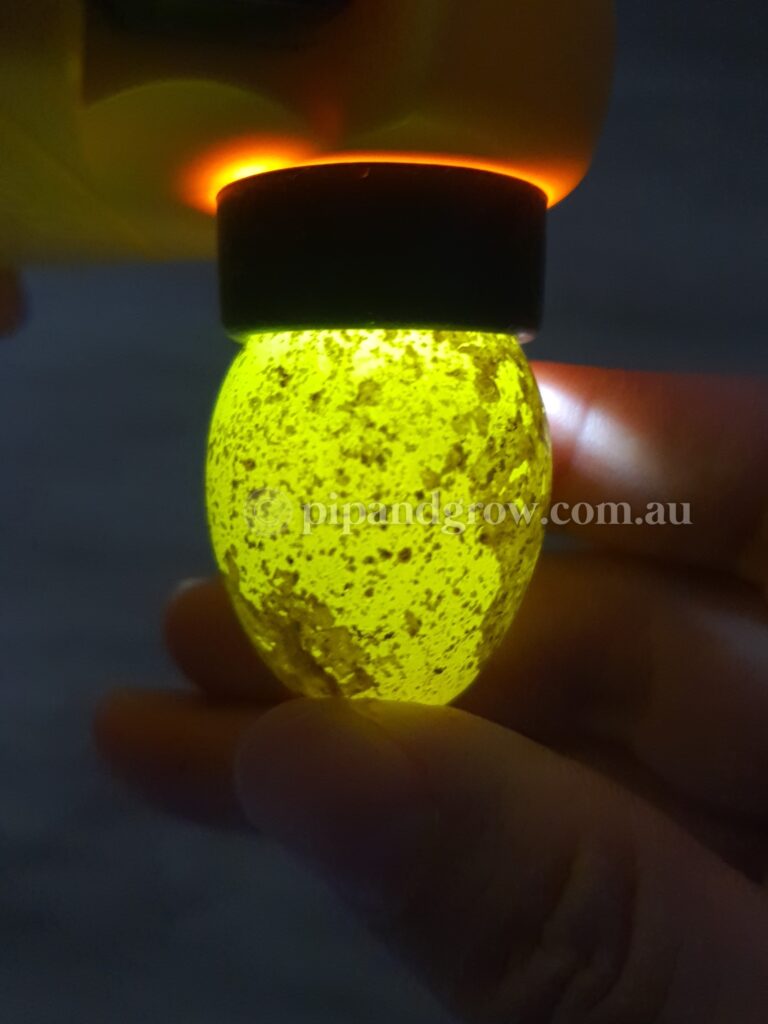
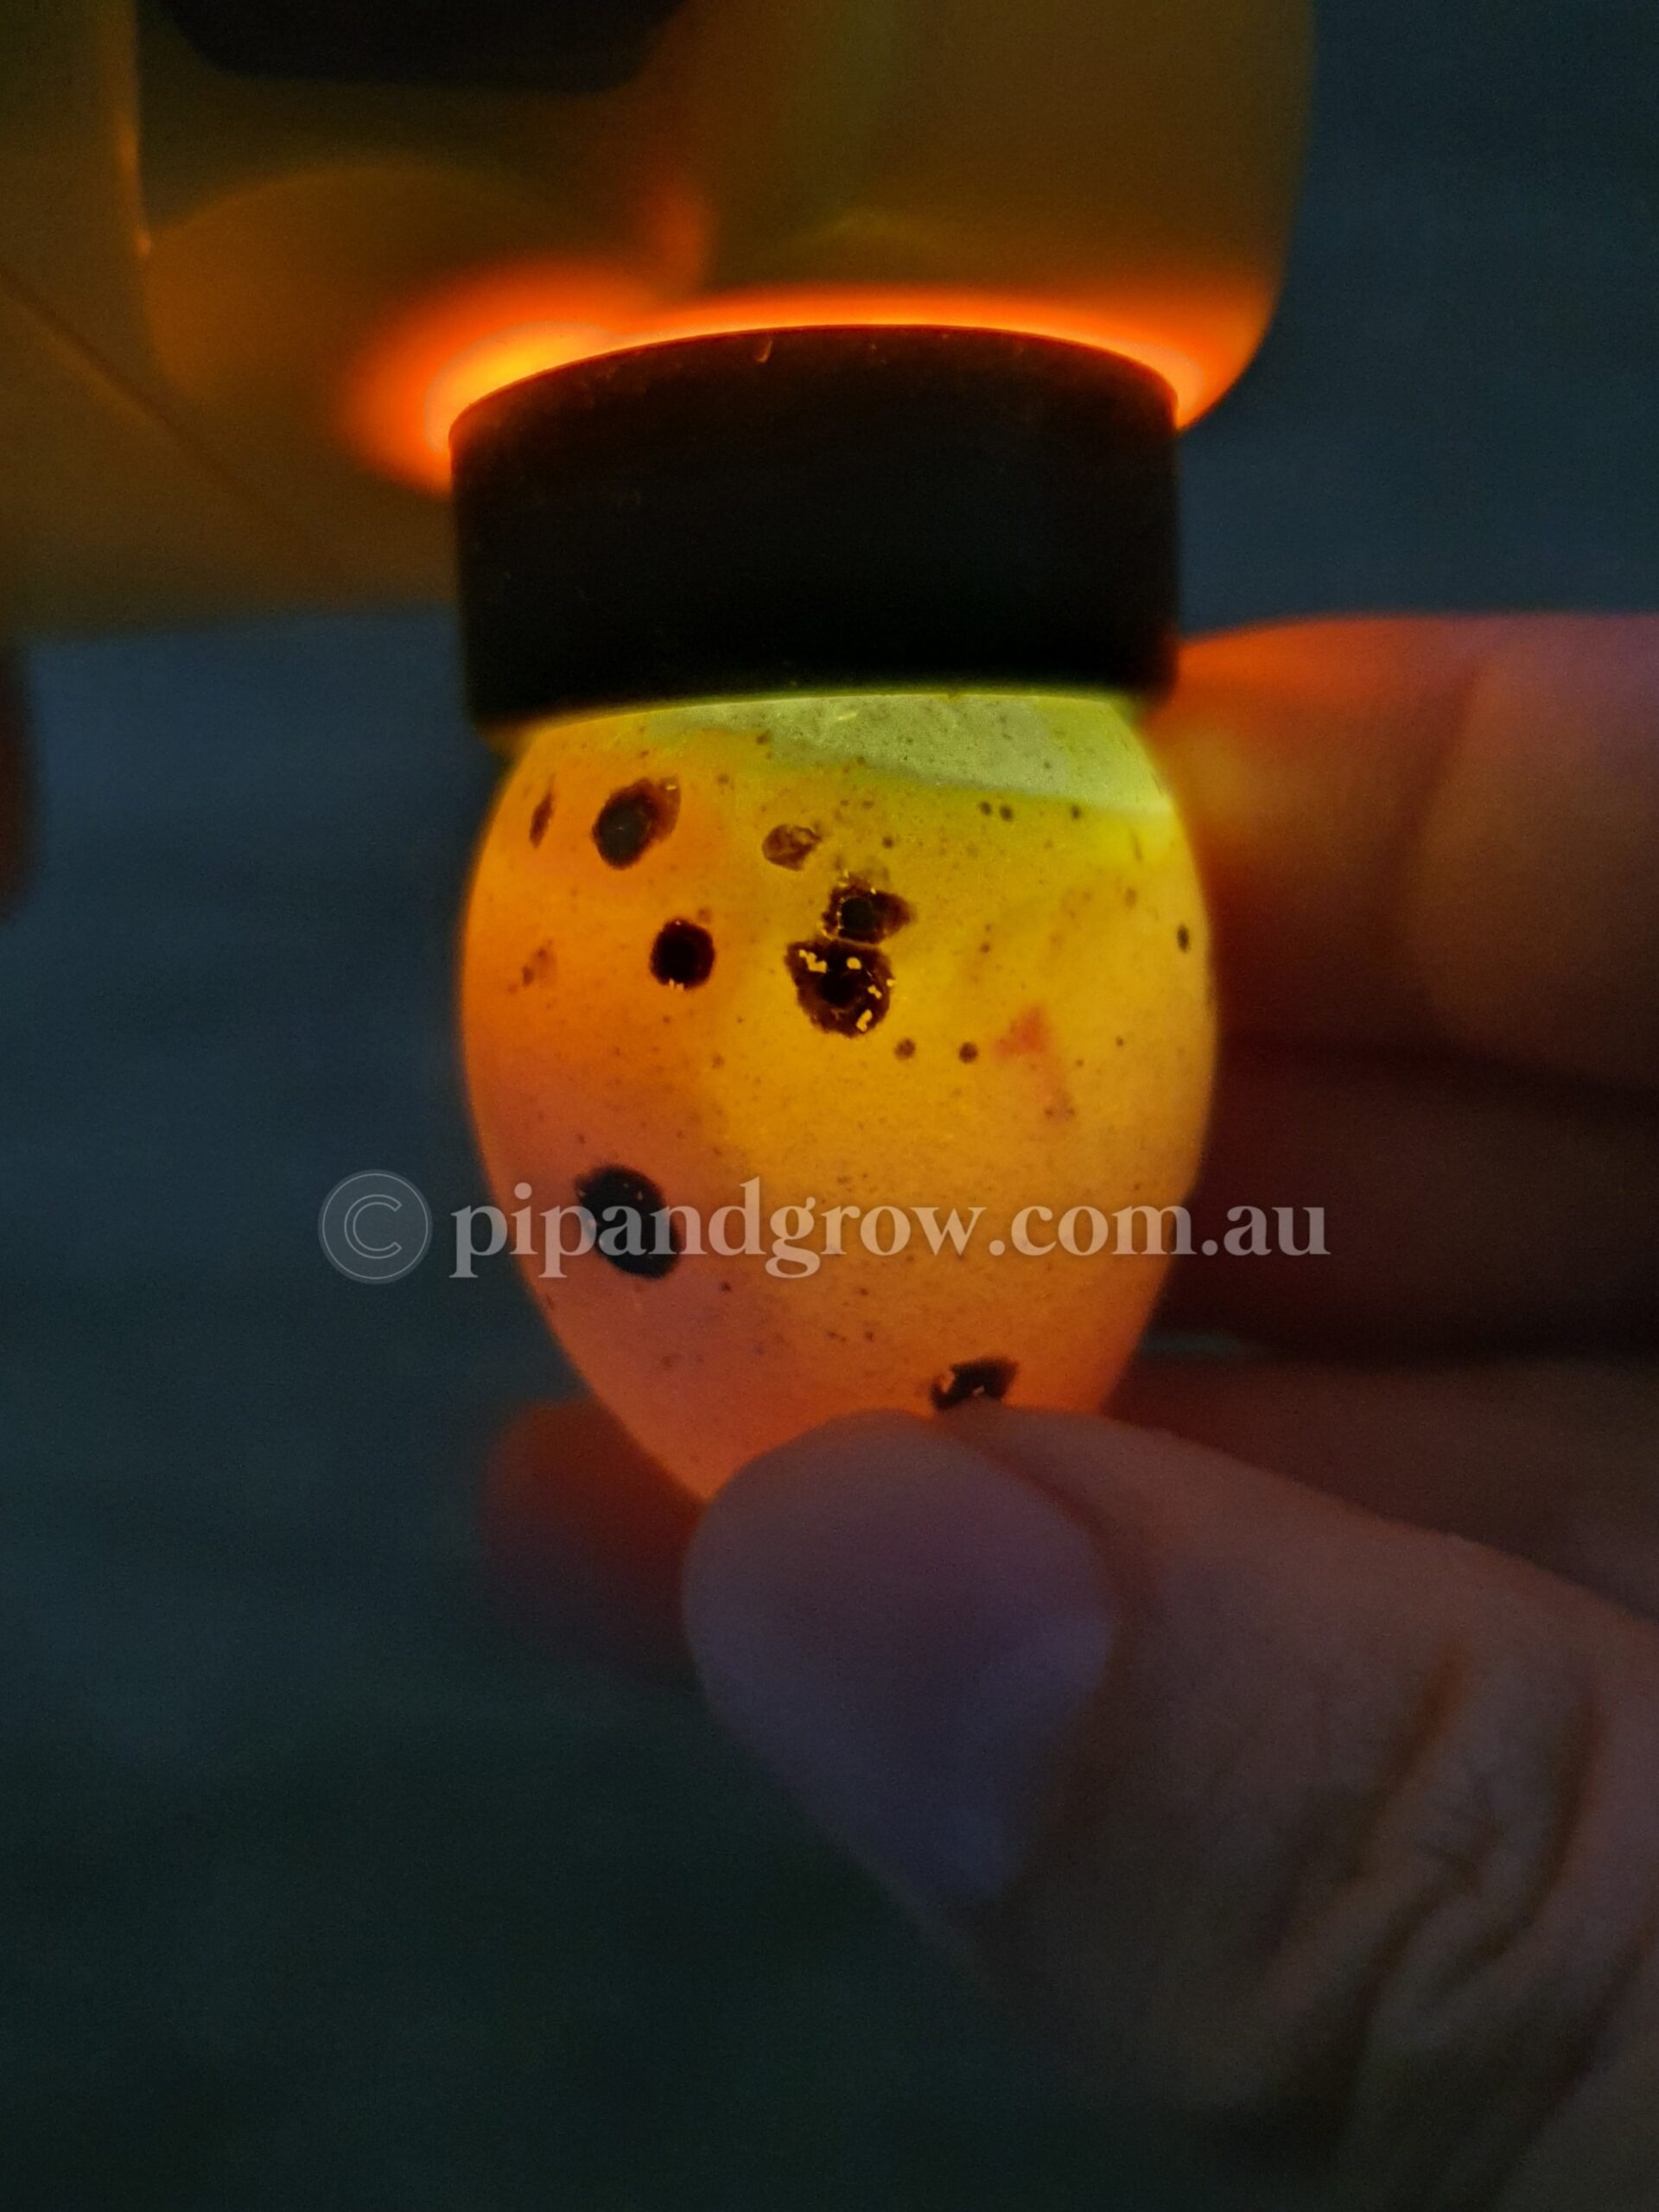
– Day 7-10 : heck your eggs for signs of development by looking for visible veins, a black dot, or other indicators of life. Dispose of any eggs that remain completely clear. Japanese quail eggs can be a bit tricky to candle due to their speckled shells. In the early stages, a developing egg will show separation ; some part will remain clear while the other darkens. In contrast, an unviable egg will stay mostly clear, with a shadow-like yolk floating freely as you gently spin the egg during candling. If you have concerns about the fertility of the eggs, this is the best time to contact the seller with photo or video evidence and seek advice..
Most sellers have a “No Responsibility” policy once eggs leave their hands, as there are many factors that are beyond the seller’s control. (Click to view) While some may offer replacements as a goodwill gesture, this is entirely at their discretion. At Pip & Grow, we offer compensation if total viability falls below 50%. Please refer to “Viability Matters” for more details.
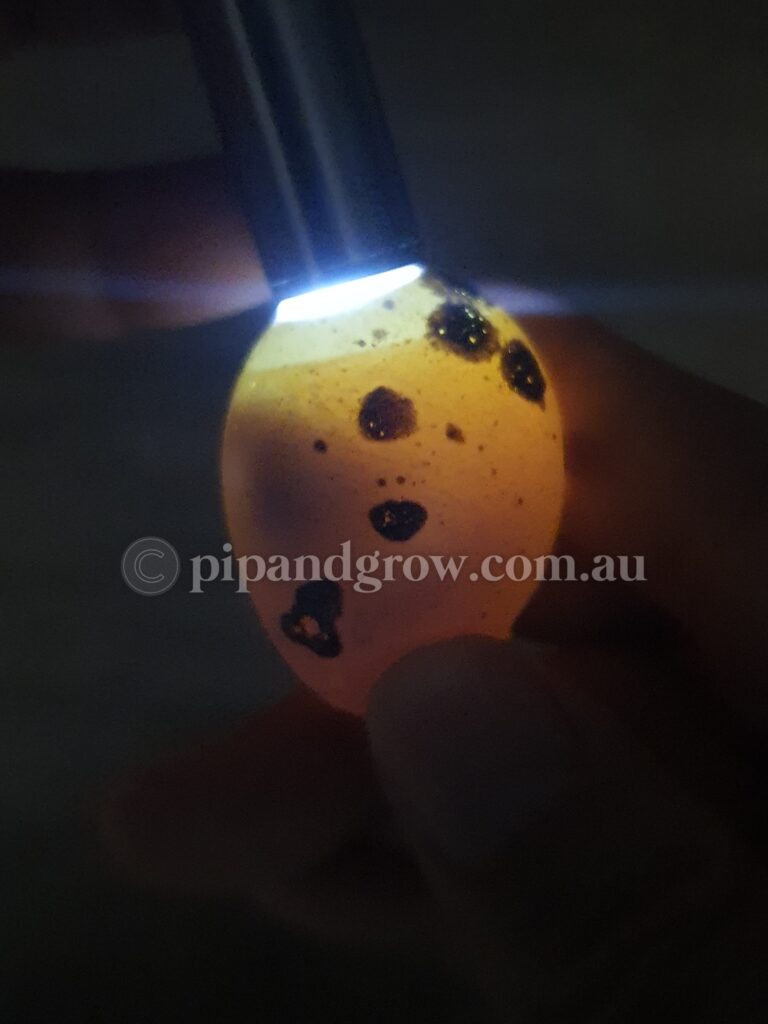
– Days 12 – 15 : conduct a second candling. Observe movement, along with well-developed veins and almost half-filled eggs. Dispose of any non-viable eggs, known as “quitters,”.
Day 15 to End of Hatching (Generally 18-19th day) : “Lock Down”
– Temperature : 37.0 -37.5°C
– Humidity : Between 60-65% are MUST during this stage.
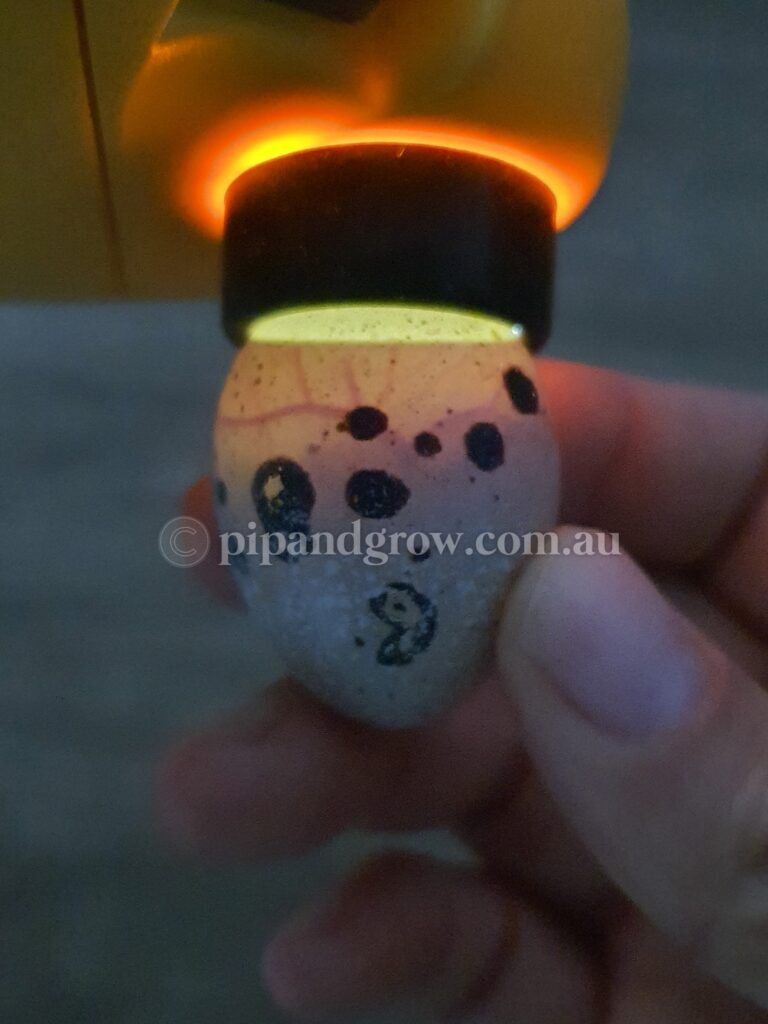
– Day 15 : it’s time to stop turning the eggs. Remove the auto-turning trays or baskets from the incubator. Perform a final candling before lockdown and discard any eggs that appear cloudy or have floating or liquid contents inside.
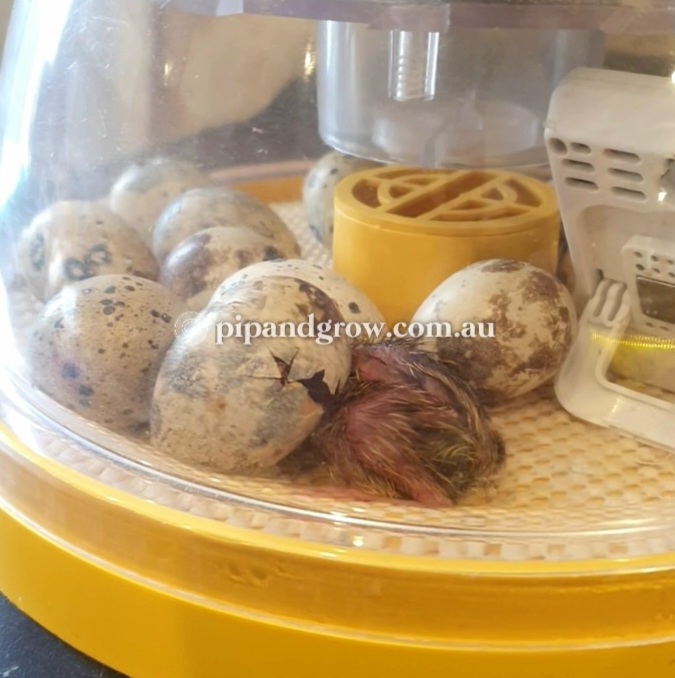
Place the eggs on a non-slip surface, laying them flat. Check the incubator carefully for any small gaps where newly hatched Japanese quail chicks could get stuck or injured. These chicks are very small, and their thin legs can easily fall into holes or get trapped in gaps. Since the incubator should not be opened during the lockdown period, ensuring a safe hatching environment is crucial.
– LOCKDOWN : Increase the humidity by adding water, then close the incubator and refrain from opening it until all the eggs have hatched or, at the latest, by Day 19th for the Japanese quail eggs. This process is commonly known as “Lockdown.”
“Lockdown” is a crucial stage in the incubation process where humidity is increased to facilitate easier hatching for the chicks. This mimics the natural conditions provided by mother hens, who naturally increase humidity with their body temperature and skin oils. The higher humidity softens the eggshells and thin membrane inside, aiding in the hatching process.
During lockdown, it’s essential to avoid opening the incubator unnecessarily. Even a brief opening can cause the thin membrane to shrink, a phenomenon known as “shrink wrapping.” This can lead to the death of unhatched or nearly hatched chicks. While some may argue for quick, two-second openings without issues, there’s no need to take this risk.
In cases where a chick may seem to need assistance hatching, it’s generally best to allow it to hatch on its own. Intervening could potentially harm the chick or disrupt the natural hatching process. While assisting a struggling chick may seem compassionate, it’s important to consider the risks to the other healthy eggs in the batch. Our experience has shown that it’s not worth jeopardizing the well-being of the entire hatch for the sake of one chick.
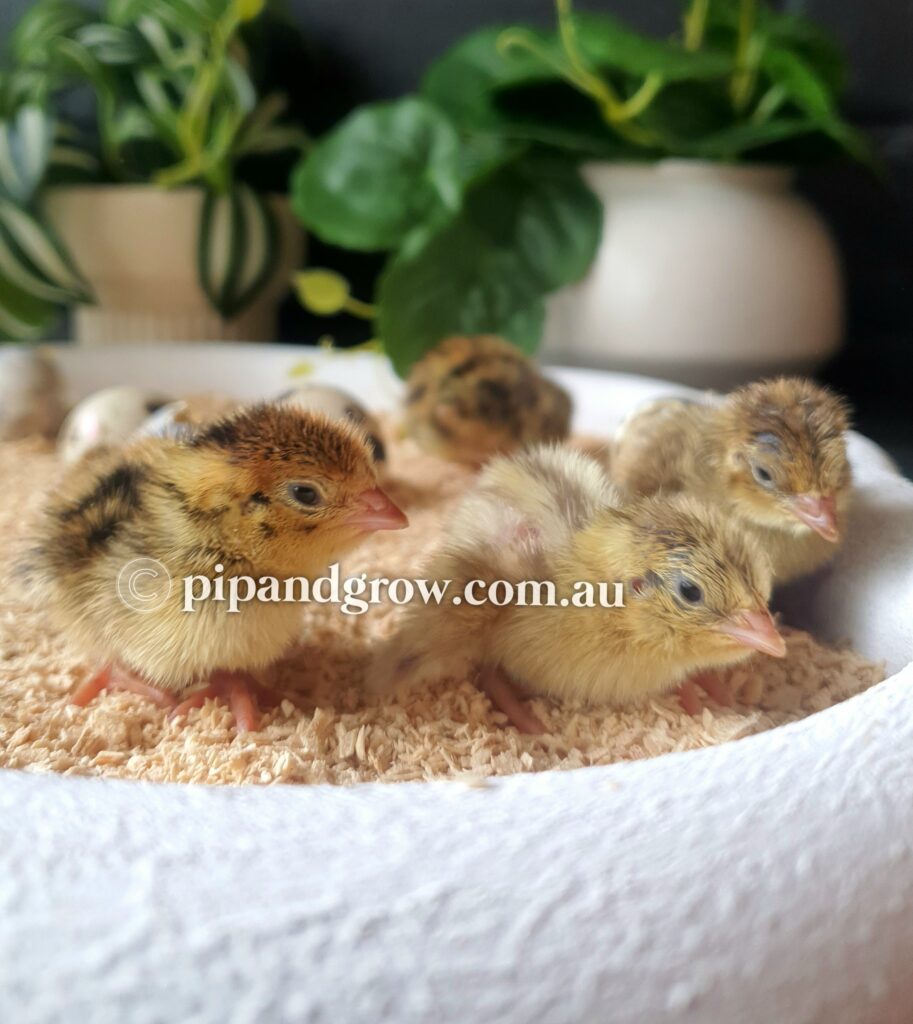
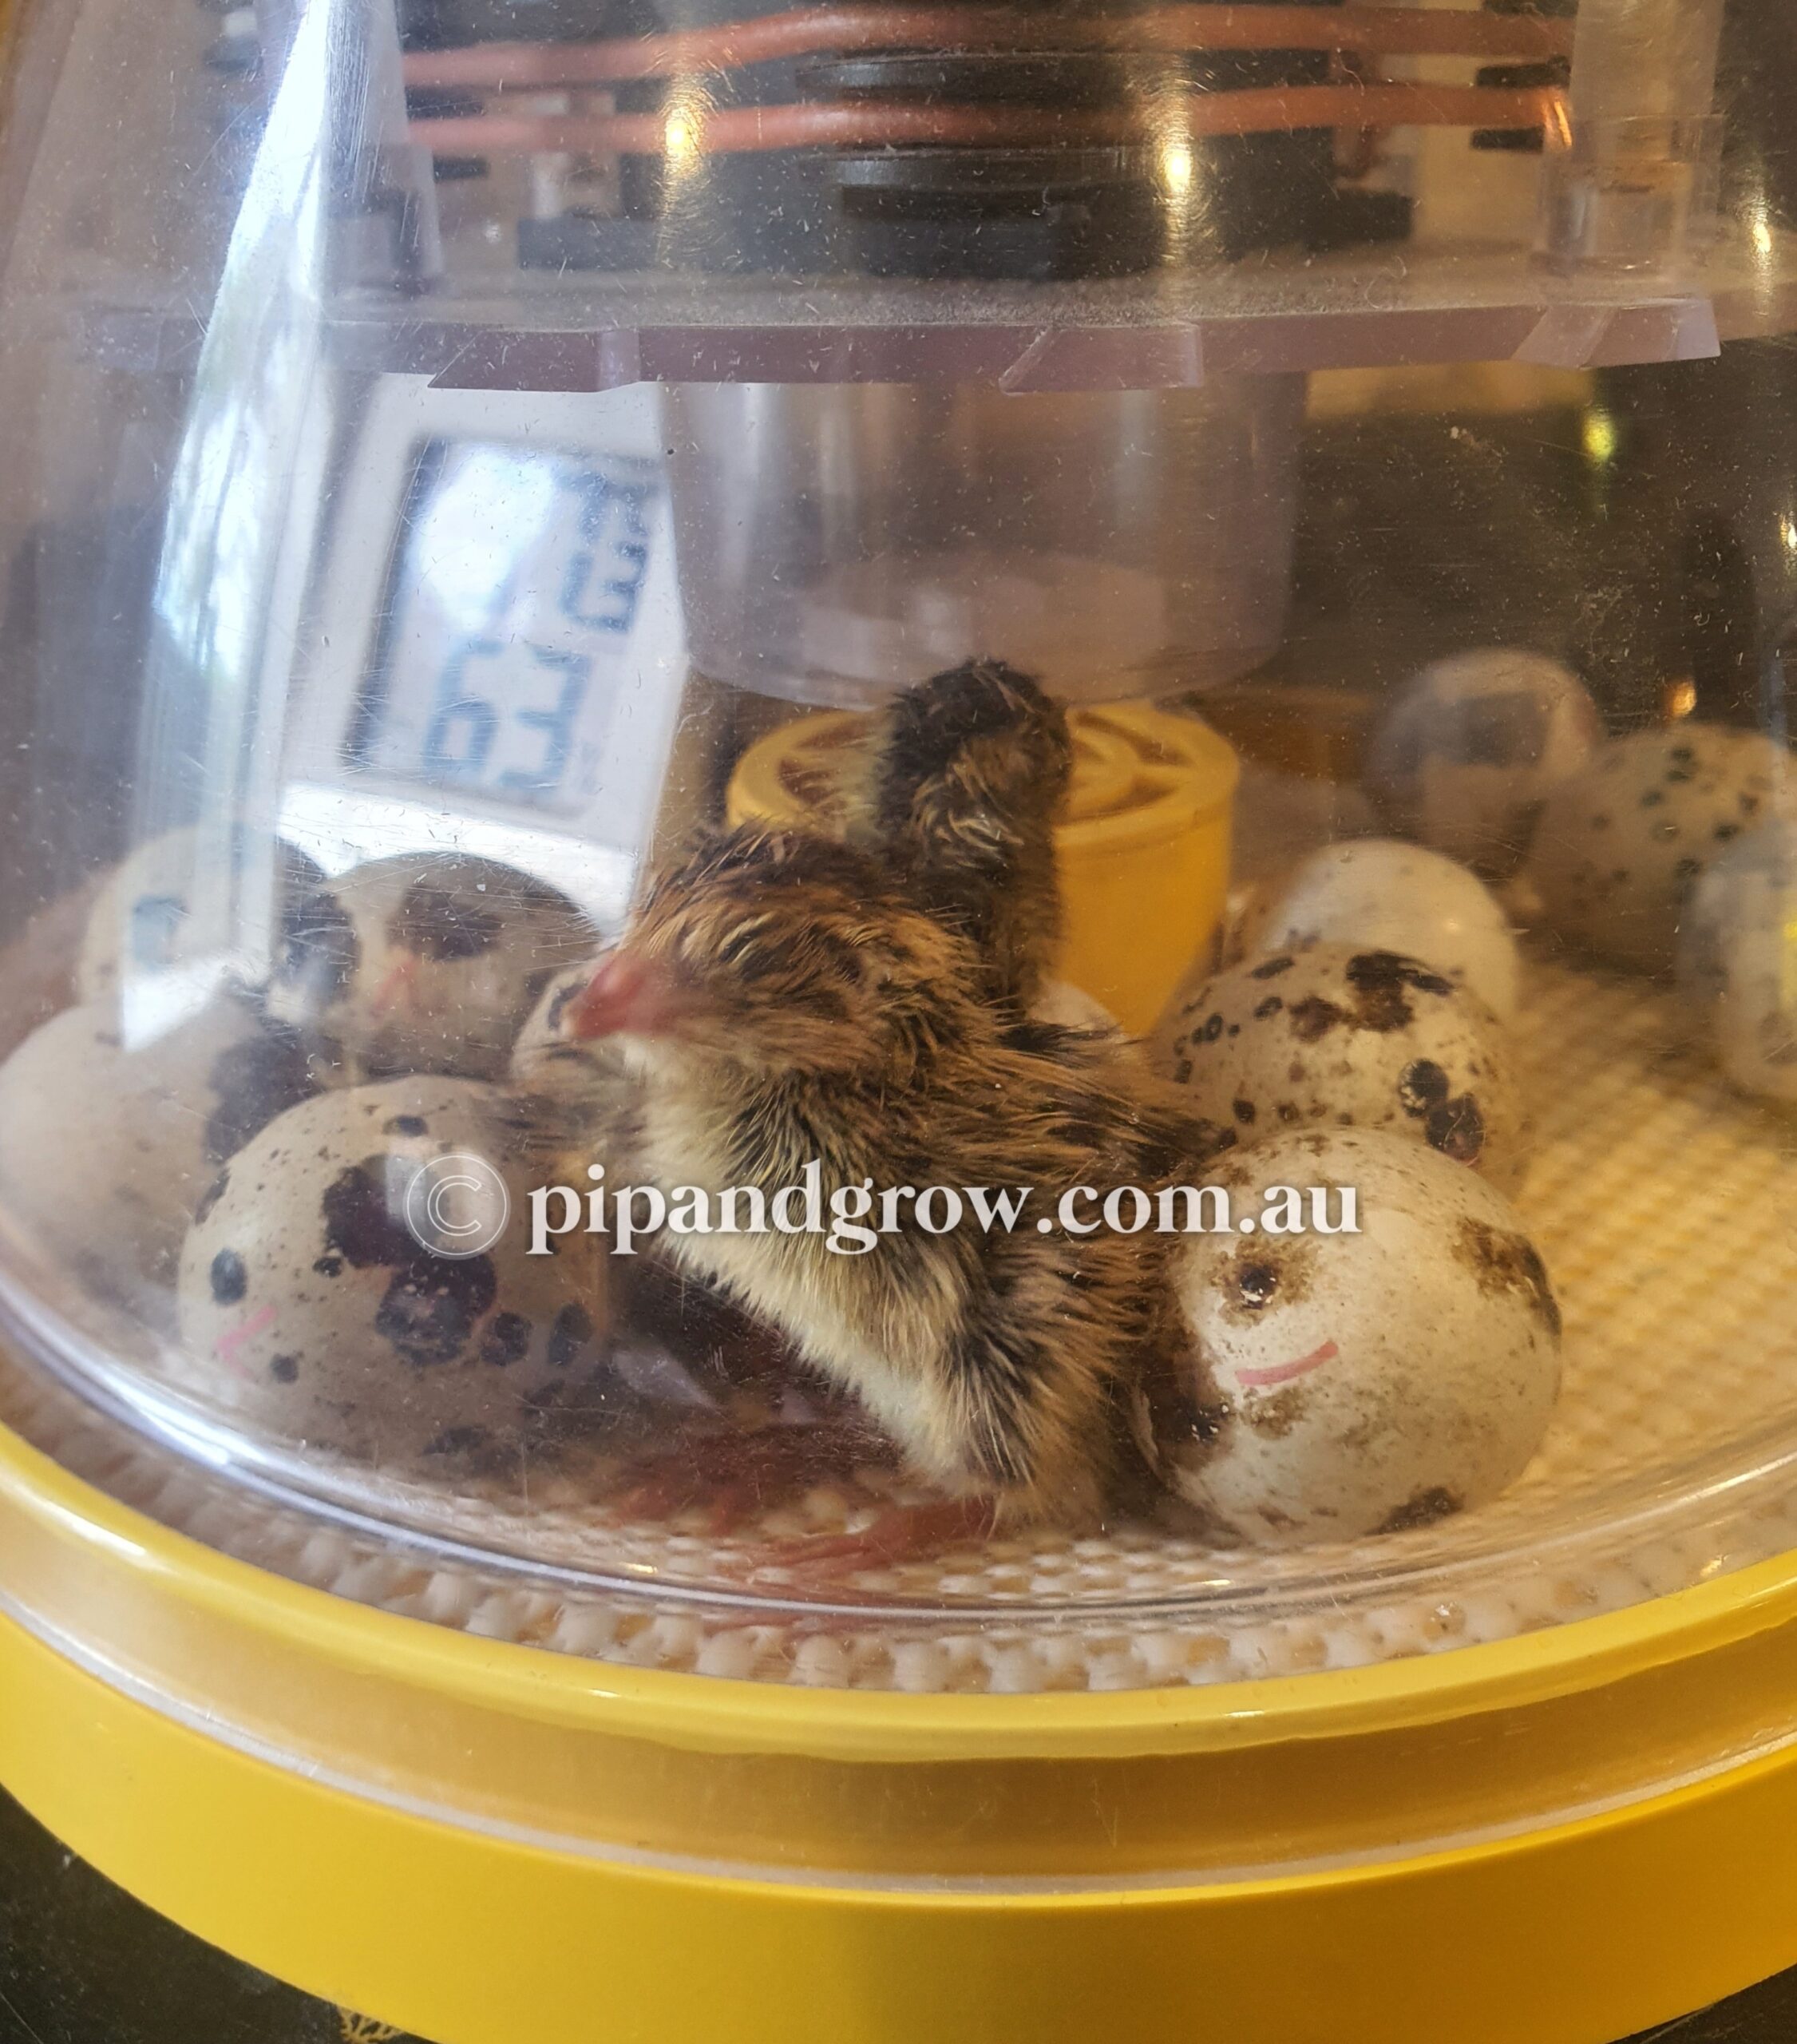
– Quail Chicks are equipped to go without water and food for 48 to 72 hours inside the incubator. Therefore, there is no need to open the incubator and remove the chicks while others are still hatching. During this time, they utilize the nutrients they absorbed prior to hatching. It’s actually beneficial for them to remain inside the incubator during this period, as it allows them to fully dry and recuperate before being moved to the brooder.
– Once the chicks are dry, transfer them directly to the brooder, where they will quickly begin eating and drinking. Avoid placing feeders and waterers near corners, and ensure there are enough gaps between objects for them to move through easily. The waterer should be shallow to prevent drowning, as these tiny mischief-makers can easily get into trouble. Keep them warm and monitor for common issues such as splayed leg, slipped tendon, wry neck, or curled toes and assist if required.
– Please see Japanese quail brooder & Habitat set up.